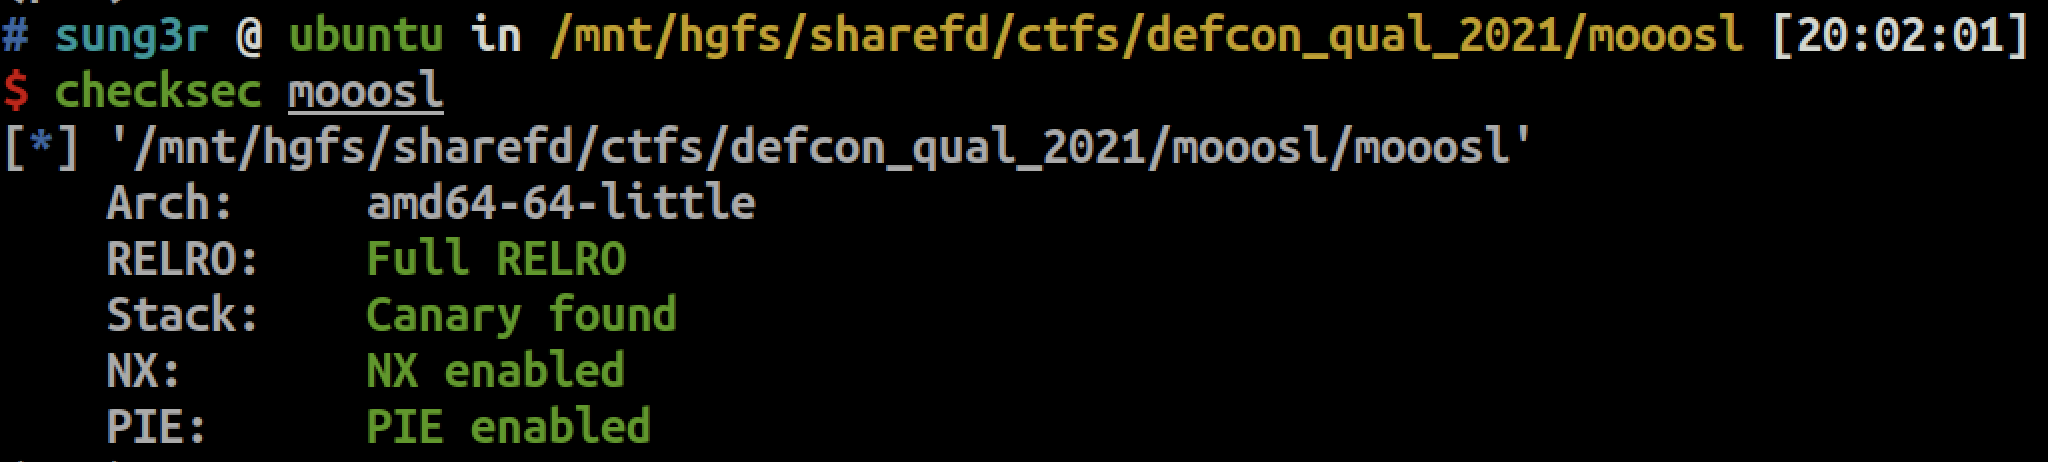
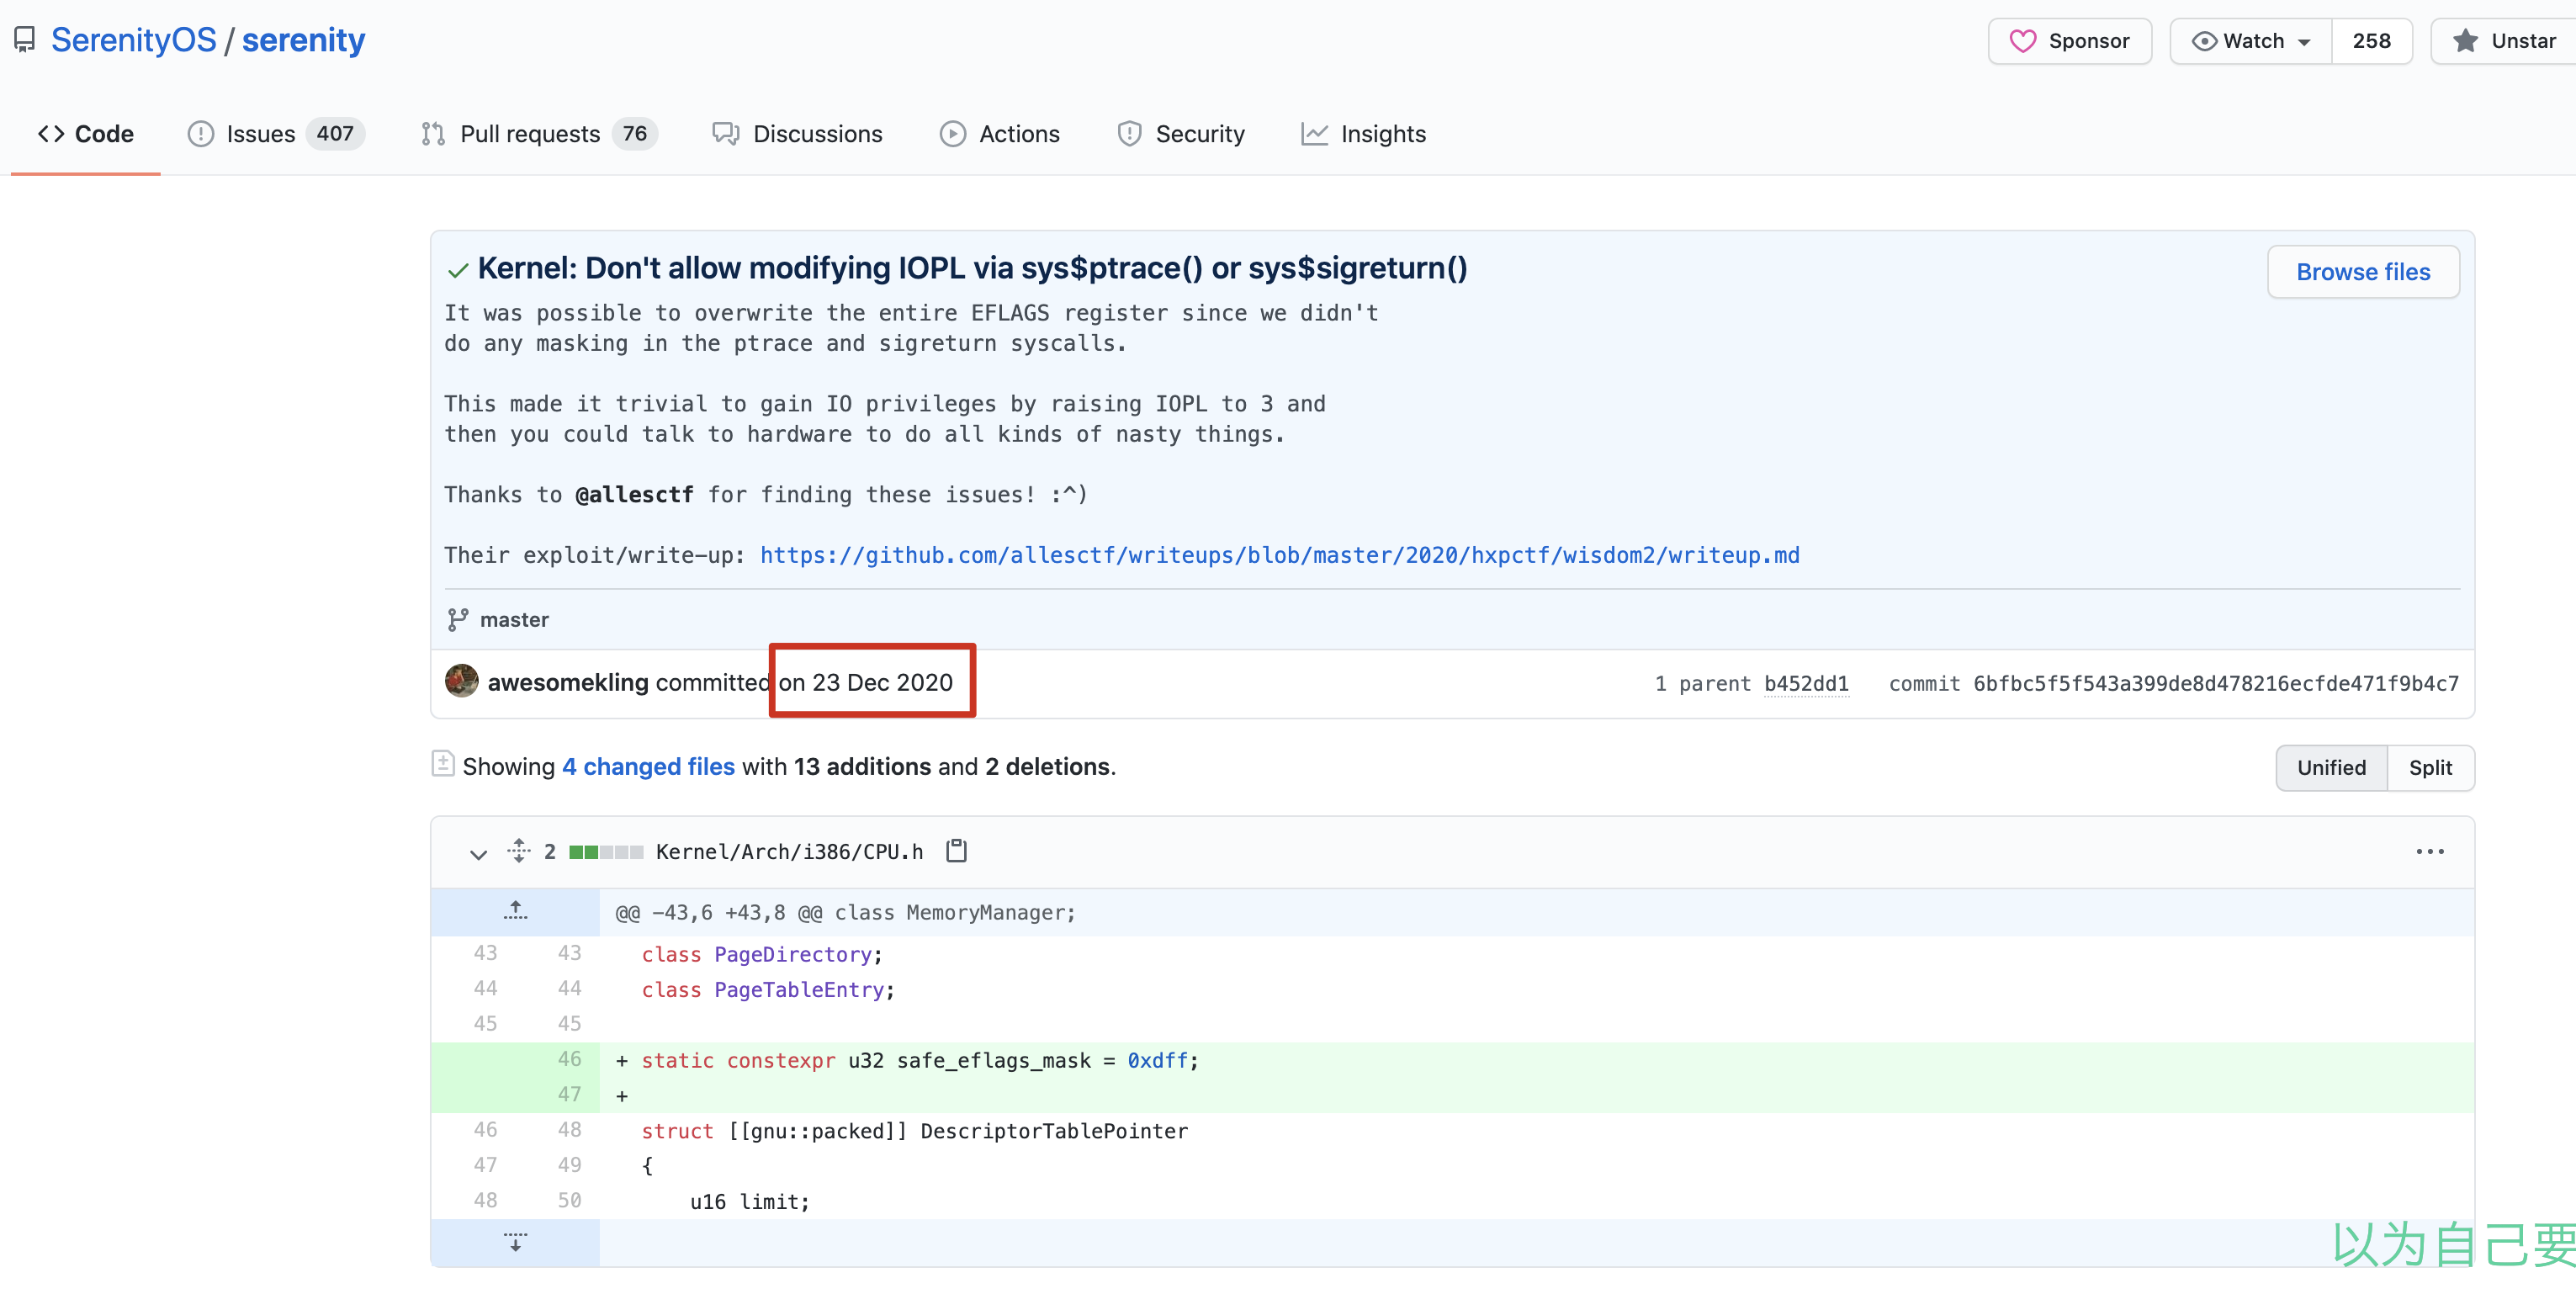
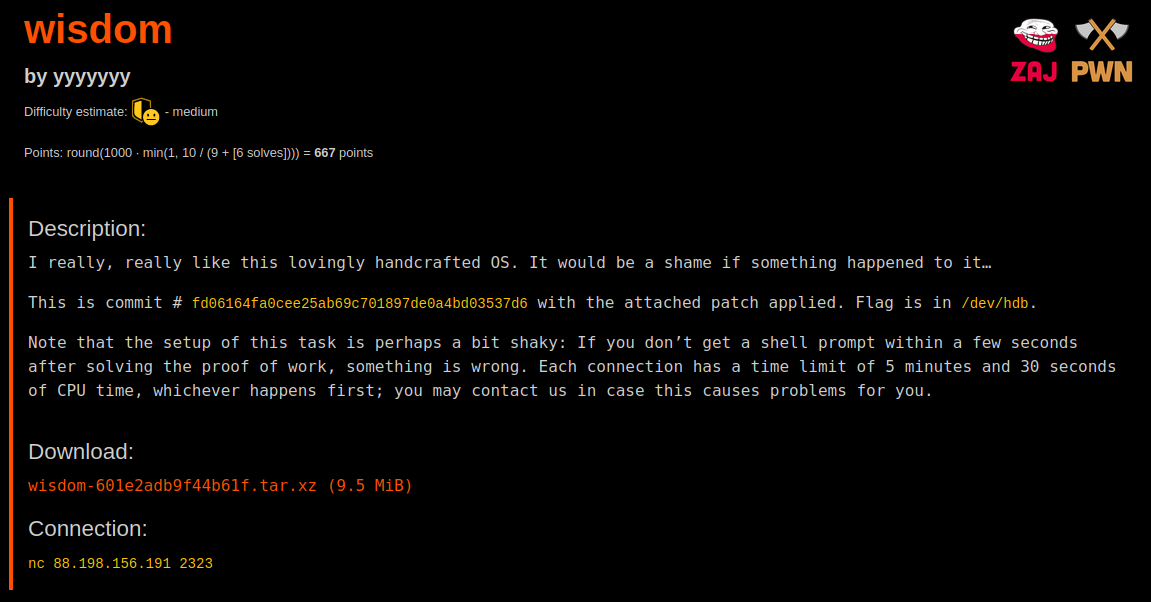
走过一趟,总要留下点什么

本文首发于安全客:解决第一个UEFI PWN——Accessing the Truth解题思路

前段时间打了场PWN2WIN,期间遇到了这道BIOS题,正好来学习一下UEFI PWN
title

题目包含下列文件
title

题目分析

run.py是题目给的启动脚本

1
2
3
4
5
6
7
8
9
10
11
12
13
14
15
16
17
18
19
20
21
22
23
24
25
26
27
28
29
30
31
32
33
34
35
36
37
38
#!/usr/bin/python3 -u
import random
import string
import subprocess
import tempfile

def random_string(n):
return ''.join(random.choice(string.ascii_lowercase) for _ in range(n))

def check_pow(bits):
r = random_string(10)
print(f"hashcash -mb{bits} {r}")
solution = input("Solution: \n").strip()
if subprocess.call(["hashcash", f"-cdb{bits}", "-r", r, solution],
cwd="/tmp",
stdout=subprocess.DEVNULL,
stderr=subprocess.DEVNULL) != 0:
raise Exception("Invalid PoW")

#check_pow(25)

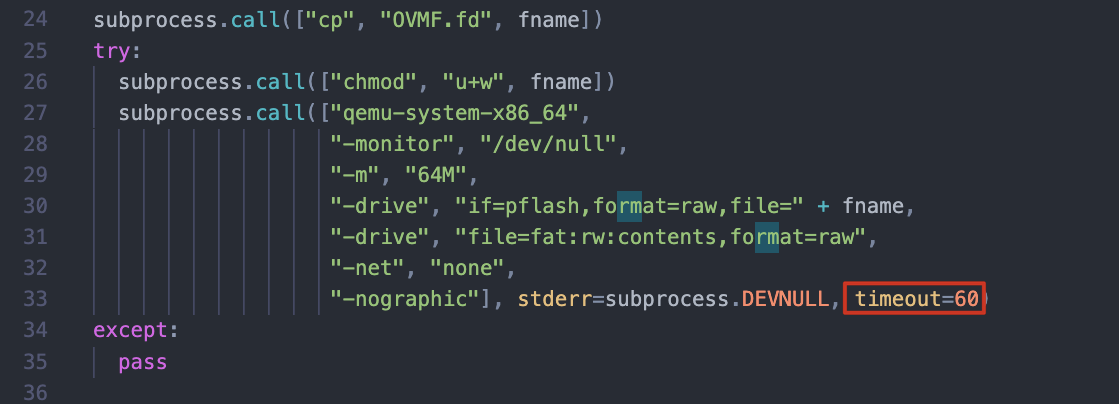
fname = tempfile.NamedTemporaryFile().name

subprocess.call(["cp", "OVMF.fd", fname])
try:
subprocess.call(["chmod", "u+w", fname])
subprocess.call(["qemu-system-x86_64",
"-monitor", "/dev/null",
"-m", "64M",
"-drive", "if=pflash,format=raw,file=" + fname,
"-drive", "file=fat:rw:contents,format=raw",
"-net", "none",
"-nographic"], stderr=subprocess.DEVNULL, timeout=60)
except:
pass

subprocess.call(["rm", "-rf", fname])
print("Bye!")

注释掉pow,直接启动。启动起来是一个低权限用户的linux虚拟机,目标是获取根目录下flag.txt的内容,典型的内核题
title

仔细看启动命令,貌似没加载任何可疑的虚拟设备,排除掉QEMU逃逸
title

解开contents/initramfs.cpio,看到init文件。这里有一条mount -t efivarfs efivarfs /sys/firmware/efi/efivars,怀疑是UEFI PWN
title

另外,启动脚本里有60秒的timout,需要把这里干掉
title

Read More

本文首发于安全客:PWN掉一款小型开源OS——续篇:内核态PWN

title
本篇文章是coooinbase这道题的内核态利用。作为上一篇文章PWN掉一款小型开源OS——用户态利用的续篇,本文将解决上文遗留下的一些问题,并分析从userland到kerneland的利用机会。

遗留下的问题

1
2
3
4
5
6
7
8
9
10
11
12
13
14
15
16
17
18
19
20
21
22
from pwn import *
import bson

context.arch = 'aarch64'

obj = {
'CVC':111,
'MON':1,
'YR': 2021
}
bs = bson.dumps(obj)

bs = bs[:-1]
bs += b'\x02'
bs += b'CC'
bs += b'\x00'
bs += p32(0x10)
bs += b'A'*(0x60)
bs += b'\x00'
bs += b'\x00'

print(b64e(bs)+' ')

若按照上一篇文章的bson结构去构造payload,即'CVC':111,当payload大于一定长度时会导致不能到达以下分支,没法触发漏洞
title

原因是copy_payload的返回值不为0
title

copy_payload执行到这个分支即可返回0,经过测试'CVC':545能通过check
title

按以下方法构造bson序列,便能发送长字符串,并触发栈溢出

1
2
3
4
5
6
7
8
9
10
11
12
13
14
15
16
17
18
19
20
21
22
from pwn import *
import bson

context.arch = 'aarch64'

obj = {
'CVC':545,
'MON':1,
'YR': 2021
}
bs = bson.dumps(obj)

bs = bs[:-1]
bs += b'\x02'
bs += b'CC'
bs += b'\x00'
bs += p32(0x10)
bs += b'A'*(0x60)
bs += b'\x00'
bs += b'\x00'

print(b64e(bs)+' ')

title

Read More

本文首发于安全客:PWN掉一款小型开源OS——用户态利用

title
题目来源于DefCon Quals 2021的coooinbase二连pwn,第一部分是用户空间利用,第二部分是内核利用。本篇文章是coooinbase用户态pwn的解题思路。

在Github上找到对应源码
title

这是一款极其精简的的OS,没有shell,甚至只实现了有限的几个系统调用,包括open、read、write等。在coooinbase.bin这个内核基础上,再跑着一个用户态进程run,以下是关于run这个用户态进程的pwn
title

Ruby源码审计

给了以下几个文件,执行ruby x.rb启动题目环境
title

解压文件系统

1
2
3
4
5
6
mkdir /tmp/dos
sudo mount -o loop ./rootfs.img /tmp/dos
file /tmp/dos/bin
/tmp/dos/bin: PDP-11 kernel overlay
cat /tmp/dos/flg
OOO{this_is_from_userland}

x.rb,会对输入的credit_card进行校验,看下是否valid,可用4485-7873-4804-0088通过检查
title

通过POST方法/gen-bson获取cvvexpmonthexpyearcardnumber参数,序列化成bson数据,最后转成base64。但是,bson只能接受0x0~0x7f的utf-8数据,超出这个范围的byte数据会导致没法通过x.rb的check,这为后续构造rop带来困难。
title

Read More

本文首发于安全客:借助DefCon Quals 2021的mooosl学习musl mallocng(漏洞利用篇)

上篇我们大致过了一遍musl libc 1.2.2的mallocng源码,了解到musl堆管理器用以下的结构管理着meta、group以及chunk。本篇我们继续来分析mooosl这道题的解题思路。
title

静态分析

保护全开
title

程序主要提供了storequerydelete这几个功能,下面逐个功能进行分析
title

sotre,申请0x30的chunk,用于存放key、value以及对应的size,另外还会算出hash和prev_hash_map(保存着hash_map先前在该处的指针)
title

set_key和set_value,比较类似,根据输入的size去申请chunk,然后填入key和value,所以store方法一共会申请3个chunk
title

get_hash,返回一个hash值,返回后只取低12位,根据这个hash得到hash_map[hash&0xfff],先将hash_map[hash&0xfff]原有的值保存在prev_hash_map,然后将0x30 chunk的地址存入hash_map[hash&0xfff]
title

query,查询功能,根据输入的key,找到对应的value并以hex字符串形式输出。注意到这里调了set_key,会先申请chunk用于存放key,最后再free掉。
title

查找过程是遍历hash_map找到对应key,如果prev_hash_map不为零,则会打印出prev_hash_map的数据
title

Read More

本文首发于安全客:借助DefCon Quals 2021的mooosl学习musl mallocng(源码审计篇)

title
本题来源于DefCon Quals 2021的mooosl,考察点是最新版本musl libc 1.2.2利用。

关于musl libc的资料比赛期间找到过一篇从一次 CTF 出题谈 musl libc 堆漏洞利用,碍于musl libc在1.2.x之后的堆管理机制有较大的改版,因而有了该文章。本次文章分上下两篇,从musl libc 1.2.2的源码审计、调试,以及其中的利用机会,再到mooosl这道题的解题过程做一个分析。

musl libc 1.2.2的源码可以从此处下载获得。1.2.x采用src/malloc/mallocng内的代码,其堆管理结构与早期版本几乎完全不同,而早期的堆管理器则放入了src/malloc/oldmalloc中。
title

调试带符号的musl libc

0x01源码编译

题目提供的libc.so不带符号,很难通过调试去理解musl堆管理器的数据结构,可以通过源码编译,生成一份带调试符号的libc.so,进行源码级debug。

1
2
3
4
5
6
7
8
9
10
11
12
tar -xzvf ./musl-1.2.2.tar.gz
cd musl-1.2.2
mkdir build x64
cd build

CC="gcc" CXX="g++" \
CFLAGS="-g -g3 -ggdb -gdwarf-4 -Og -Wno-error -fno-stack-protector" \
CXXFLAGS="-g -g3 -ggdb -gdwarf-4 -Og -Wno-error -fno-stack-protector" \
../configure --prefix=/home/sung3r/workspace/sharefd/glibc/glibc-2.32/x64 --disable-werror

make
make install

/src/x64/下找到编译好的libc.so

通过patchelf将ld.so改成libc.so即可,gdb调试时加上dir /path/to/musl-1.2.2/src/malloc/dir /path/to/musl-1.2.2/src/malloc/mallocng便可源码调试。

Read More

本文首发于安全客:hxpCTF2020 wisdom2:Ptrace参数未校验引发的SerenityOS内核提权

本题来源于hxpCTF 2020的wisdom2,是36c3 wisdom的升级版CVE-2019-20172:36C3 wisdom中的SerenityOS内核提权,该漏洞存在于serenityOS在2020年12月23日以前提交的版本。
title
漏洞存在于sys$ptrace()与sys$sigreturn()方法,允许Userland修改Kerneland的寄存器,进一步可实现内核提权。通过修改eflags的IOPL标志位,可对系统I/O设备进行读写操作。

Description

1
2
3
4
5
6
7
8
9
10
11
12
Description:
Oops, I did it again. :^)

This is commit # 4232874270015d940a2ba62c113bcf12986a2151 with the attached patch applied. Flag is in /dev/hdb.

Note that the setup of this task is perhaps a bit shaky: If you don’t get a shell prompt within a few seconds after solving the proof of work, something is wrong. Each connection has a time limit of 10 minutes; you may contact us in case this causes problems for you.

Download:
wisdom2-c46f03732e9dceef.tar.xz (19.4 MiB)

Connection:
telnet 157.90.19.161 2323

Build

拉取对应源码https://github.com/SerenityOS/serenity/tree/4232874270015d940a2ba62c113bcf12986a2151

按照Documentation/BuildInstructions.md安装依赖,并且编译Toolchain和Kernel

先打上patch

1
git apply /path/to/hxp.patch

编译Toolchain

Read More

本文首发于安全客:CVE-2019-20172:36C3 wisdom中的SerenityOS内核提权

Description

title

1
2
3
4
5
6
7
8
9
10
11
12
13
Description:

I really, really like this lovingly handcrafted OS. It would be a shame if something happened to it…

This is commit # fd06164fa0cee25ab69c701897de0a4bd03537d6 with the attached patch applied. Flag is in /dev/hdb.

Note that the setup of this task is perhaps a bit shaky: If you don’t get a shell prompt within a few seconds after solving the proof of work, something is wrong. Each connection has a time limit of 5 minutes and 30 seconds of CPU time, whichever happens first; you may contact us in case this causes problems for you.
Download:

wisdom-601e2adb9f44b61f.tar.xz (9.5 MiB)
Connection:

nc 88.198.156.191 2323

Environment

编译过程参考编译SerenityOS操作系统这篇笔记

1
2
3
ubuntu 20.04
gcc 10.2.0
cmake 3.19.2

编译exp,在Userland/放exp源码

1
gedit ./Userland/test.cpp

先执行一遍../Meta/refresh-serenity-qtcreator.sh,提示Serenety root not set.,设置SERENITY_ROOT

Read More
post @ 2021-01-31

SerenityOS是一套用于x86计算机的图形化类Unix操作系统。为了解决hxp 36C3 CTF的wisdom这道题,首先需要编译出该系统,以下是编译步骤。
title

Environment

1
2
3
ubuntu 20.04
gcc 10.2.0
cmake 3.19.2

安装ubuntu的dependencies

1
sudo apt install build-essential curl libmpfr-dev libmpc-dev libgmp-dev e2fsprogs qemu-system-i386 qemu-utils

保证gcc版本>=10

1
2
3
sudo add-apt-repository ppa:ubuntu-toolchain-r/test
sudo apt install gcc-10 g++-10
sudo update-alternatives --install /usr/bin/gcc gcc /usr/bin/gcc-10 100 --slave /usr/bin/g++ g++ /usr/bin/g++-10

保证cmake版本>=3.16,官网下载3.19.2最新版本编译

1
2
3
./bootstrap
make -j8
sudo make install

Proxy

Read More

强制重启后无限菊花

前两天将mac关闭,等半天没关上,索性直接强制重启了,等再开机的时候。。。奔溃了,一致卡在开机进度条。

后来基本上能尝试的方法都尝试了。。。大致这几种
1.开机按住command + R键,进入macOS恢复界面,打开终端

1
2
3
4
#进入缓存目录
$ cd /Volumes/Macintosh/var/db/caches/opendirectory/
#删除缓存数据库
$ mv ./mbr_cache ./mar_cache-old

不行。。。
2.重置PRAM:开机按住Control+Command并保持3秒,试了不行
3.重置NVRem:开机按住Option+Command+R+P并保持30秒,也不行
4.开机Command+S,出现命令行提示符后输入以下命令

1
2
3
mount -uw / 
mv /var/db/.AppleSetupDone /var/db/.AppleSetupDone-old
reboot

依旧不行
5.开机按住shift,貌似安全模式,进去有safari能联网查资料,没用。。。
6.开机按住D,硬件自检,没检测到啥错误。。
7.开机按住command + R键,进入磁盘工具,急救,磁盘检测正常,没桃子用。。。
8.没法开机可以先试试这个方法如何重置Mac的SMC

想起以前问过客服,没开启磁盘加密的情况下是能直接覆盖安装系统的,不需要抹除,数据不会丢失。就这样傻傻的花了一个多小时安装系统,重启过后,还是一样的情况。。。醉了,这办法也不灵了

没办法,直接抹除重装,先进恢复模式把重要资料搞出来,毕竟数据无价。在磁盘工具->文件->新建映像->来自文件夹的映像...选中需要保存的文件夹,后缀填dmg,存储到U盘或移动硬盘上。

一个多小时后。。。终于装好了,但所有的环境都丢失了。。。

Read More

预期解

题目描述
title

defcon 2018资格赛的原题,题目文件给了一个kext IOKit内核扩展模块以及kernel二进制文件,先把环境搭起来。本地环境是macOS 10.14.6 Mojave (18G103),安装KDK 10.14.2
title

为方便调试先关掉SIP,IPwnKit.kext复制到/System/Library/Extensions/,给权限,加载

1
2
3
4
sudo cp IPwnKit.kext /System/Library/Extensions/
sudo chown -R root:wheel /System/Library/Extensions/IPwnKit.kext
sudo chmod -R 755 /System/Library/Extensions/IPwnKit.kext
sudo kextload /System/Library/Extensions/IPwnKit.kext

替换成macOS 10.14.2的内核

1
sudo cp /Library/Developer/KDKs/KDK\_10.14.2\_18C54.kdk/System/Library/Kernels/kernel.development /System/Library/Kernels/kernel

设置引导参数

1
2
3
sudo nvram boot-args="debug=0x141 kext-dev-mode=1 kcsuffix=development pmuflags=1 -v"

sudo nvram boot-args="debug=0x144 kext-dev-mode=1 kcsuffix=development pmuflags=1 -v"

1>>boot-args:系统的启动参
2>>debug=0×141,表示系统可以进行远程链接调试
3>>kext-dev-mode=1允许加载未签名kext
4>>kcsuffix=development 允许我们启动系统,通过development,与之前我们copy到/Systems/Library/Kernel下的kernel.development对应,如果我们之前拷贝的是kernel.debug,那么这里填kcsuffic=debug
5>>pmuflags=1关闭定时器
6>>-v显示内核加载信息.

Read More
⬆︎TOP